- Registriert
- 4 Aug. 2008
- Beiträge
- 1.670
Hallo,
meine Tests von hier mit dem Core 2 Quad Q9000 haben nun doch noch Früchte getragen .
.
Die benötigten Schritte, um eine FSB-1066-CPU in einem T61 zu betreiben, sind ja schon seit langem hier im Forum und an anderer Stelle im Internet zu finden. Nun ist es mir gelungen, basierend darauf auch einen Q9000 in einem T61-Board zum Laufen zu bekommen und zwar mit allen vier Cores aktiv.
Hier nun der Versuch, das ganze in einer Anleitung zusammenzufassen.
Teil 1: Wahl eines Mod-BIOS / GPU undervolten
Auf 51nb.com gibt es modifizierte BIOS-Dateien, die die Microcodes für die FSB-1066-CPUs drin haben. Im originalen Lenovo-BIOS sind diese nicht enthalten, weswegen die CPUs mit FSB 1066 (z. B. die Pxxxx-Serie) im T61 ab Werk nicht laufen.
Ursprünglich war nur eine BIOS-Version von xiaofei290 verfügbar, die die Microcodes vom W700 anstatt vom T61 drin hatte. Mit dieser Version funktionierten zwar FSB-1066-CPUs (inklusive Core2 Quad), die vorher nicht unterstützt wurden, dafür haben aber viele CPUs, die vorher im T61 liefen (z. B. T7500), anschließend nicht mehr funktioniert, da die Microcodes für diese im Mod-BIOS fehlten. Zudem war es beim Einbau eines Core2 Quad mit diesem BIOS nötig, eine modifizierte APIC-Tabelle mit dem acpi-Kommando des Bootloaders Grub2 zu laden, damit alle vier CPU-Kerne aktiviert wurden (statt nur zwei). Diese ursprüngliche Methode ist als Referenz noch in einen Post weiter unten ausgelagert, heute jedoch nicht mehr zu empfehlen. Ich verlinke das alte Mod-BIOS hier noch, jedoch gibt es nun eine deutlich bessere Alternative.
Originalpost von xiaofei290 auf 51nb.com Download-Link
Mittlerweile ist eine ganze Fülle von Mod-BIOS-Versionen von highsun auf 51nb.com verfügbar, unter anderem auch welche extra für Core2 Quads, die die modifizierte APIC-Tabelle bereits enthalten, so dass außer dem BIOS-Flash softwareseitig keine weiteren Änderungen mehr erforderlich sind. Bei all diesen Mod-BIOS-Versionen sind so gut wie alle Microcodes der Core2-Prozessoren enthalten, so dass anders als beim ursprünglichen Mod-BIOS auch Merom-CPUs wie z. B. T7500 weiterhin damit funktionieren. Zudem schalten sie SATA 2 frei und die Whitelist sowie den Thermal Sensing Error ab.
Außerdem gibt es Versionen, die den Nvidia-Grafikchip undervolten (sofern vorhanden) und so Stromverbrauch und Temperaturen senken, wodurch vermutlich auch das Ausfallrisiko durch den Nvidia-Bug verringert wird. Mit dem Lenovo-BIOS wird der Grafikchip standardmäßig mit 1,20 V unter Last und 1,15V im idle beterieben. Die Mod-BIOS-Versionen betreiben den Grafikchip immer mit der gleichen Spannung.
Weitere Versionen aktivieren PCIe Active State Power Management oder übertakten den Nvidia-Grafikchip auf core450 400 / shader 900 / video-ram 700.
Originalpost von highsun auf 51nb.com Achtung, die Bios-Dateien mit dem GPU-Undervolting im ersten Post dort hatten noch einen Fehler drin, die berichtigten Versionen sind dort in Post 76 und hier in der Tabelle verlinkt.
[TABLE="class: grid, width: 1000, align: left"]
[TR]
[TD]Mod-BIOS Download-Link
[/TD]
[TD]Quadcore-APIC-Tabelle
[/TD]
[TD]Spannung der Nvidia-GPU
[/TD]
[TD]ASPM aktiviert
[/TD]
[TD]NVidia-GPU übertaktet
[/TD]
[/TR]
[TR]
[TD]专门网论坛_T61-BIOS.rar
[/TD]
[TD]nein[/TD]
[TD]Standard (1,15 V - 1,20 V)[/TD]
[TD]nein[/TD]
[TD]nein[/TD]
[/TR]
[TR]
[TD]专门网论坛_T61Q_BIOS.rar
[/TD]
[TD]ja[/TD]
[TD]Standard (1,15 V - 1,20 V)[/TD]
[TD]nein[/TD]
[TD]nein[/TD]
[/TR]
[TR]
[TD]专门网论坛_T61-BIOS(1.05).rar
[/TD]
[TD]nein[/TD]
[TD]1,05 V[/TD]
[TD]nein[/TD]
[TD]nein[/TD]
[/TR]
[TR]
[TD]专门网论坛_T61-BIOS(1.05)_ASPM.rar
[/TD]
[TD]nein[/TD]
[TD]1,05 V[/TD]
[TD]ja[/TD]
[TD]nein[/TD]
[/TR]
[TR]
[TD]专门网论坛_T61Q_BIOS(1.05).rar
[/TD]
[TD]ja[/TD]
[TD]1,05 V[/TD]
[TD]nein[/TD]
[TD]nein[/TD]
[/TR]
[TR]
[TD]专门网论坛_T61Q_BIOS(1.05)_ASPM.rar
[/TD]
[TD]ja[/TD]
[TD]1,05 V[/TD]
[TD]ja[/TD]
[TD]nein[/TD]
[/TR]
[TR]
[TD]专门网论坛_T61-BIOS(1.0).rar
[/TD]
[TD]nein[/TD]
[TD]1,00 V[/TD]
[TD]nein[/TD]
[TD]nein[/TD]
[/TR]
[TR]
[TD]专门网论坛_T61-BIOS(1.0)_ASPM.rar
[/TD]
[TD]nein[/TD]
[TD]1,00 V[/TD]
[TD]ja[/TD]
[TD]nein[/TD]
[/TR]
[TR]
[TD]专门网论坛_T61-BIOS(1.0)_OC.rar
[/TD]
[TD]nein[/TD]
[TD]1,00 V[/TD]
[TD]nein[/TD]
[TD]ja[/TD]
[/TR]
[TR]
[TD]专门网论坛_T61-BIOS(1.0)_ASPM_OC.rar
[/TD]
[TD]nein[/TD]
[TD]1,00 V[/TD]
[TD]ja[/TD]
[TD]ja[/TD]
[/TR]
[TR]
[TD]专门网论坛_T61Q_BIOS(1.0).rar
[/TD]
[TD]ja[/TD]
[TD]1,00 V[/TD]
[TD]nein[/TD]
[TD]nein[/TD]
[/TR]
[TR]
[TD]专门网论坛_T61Q_BIOS(1.0)_ASPM.rar
[/TD]
[TD]ja[/TD]
[TD]1,00 V[/TD]
[TD]ja[/TD]
[TD]nein[/TD]
[/TR]
[TR]
[TD]专门网论坛_T61Q_BIOS(1.0)_OC.rar
[/TD]
[TD]ja[/TD]
[TD]1,00 V[/TD]
[TD]nein[/TD]
[TD]ja[/TD]
[/TR]
[TR]
[TD]专门网论坛_T61Q_BIOS(1.0)_ASPM_OC.rar
[/TD]
[TD]ja[/TD]
[TD]1,00 V[/TD]
[TD]ja[/TD]
[TD]ja[/TD]
[/TR]
[TR]
[TD]专门网论坛_T61-BIOS(0.95).rar
[/TD]
[TD]nein[/TD]
[TD]0,95 V[/TD]
[TD]nein[/TD]
[TD]nein[/TD]
[/TR]
[TR]
[TD]专门网论坛_T61-BIOS(0.95)_ASPM.rar
[/TD]
[TD]nein[/TD]
[TD]0,95 V[/TD]
[TD]ja[/TD]
[TD]nein[/TD]
[/TR]
[TR]
[TD]专门网论坛_T61Q_BIOS(0.95).rar
[/TD]
[TD]ja[/TD]
[TD]0,95 V[/TD]
[TD]nein[/TD]
[TD]nein[/TD]
[/TR]
[TR]
[TD]专门网论坛_T61Q_BIOS(0.95)_ASPM.rar
[/TD]
[TD]ja[/TD]
[TD]0,95 V[/TD]
[TD]ja[/TD]
[TD]nein[/TD]
[/TR]
[TR]
[TD]专门网论坛_T61-BIOS(0.9).rar
[/TD]
[TD]nein[/TD]
[TD]0,90V[/TD]
[TD]nein[/TD]
[TD]nein[/TD]
[/TR]
[TR]
[TD]专门网论坛_T61-BIOS(0.9)_ASPM.rar
[/TD]
[TD]nein[/TD]
[TD]0,90V[/TD]
[TD]ja[/TD]
[TD]nein[/TD]
[/TR]
[TR]
[TD]专门网论坛_T61Q_BIOS(0.9).rar
[/TD]
[TD]ja[/TD]
[TD]0,90V[/TD]
[TD]nein[/TD]
[TD]nein[/TD]
[/TR]
[TR]
[TD]专门网论坛_T61Q_BIOS(0.9)_ASPM_.rar
[/TD]
[TD]ja[/TD]
[TD]0,90V[/TD]
[TD]ja[/TD]
[TD]nein[/TD]
[/TR]
[/TABLE]
Zuerst überprüfen, ob man die neuste EC-Firmware 1.08 auf seinem T61 hat. Falls nicht, zunächst das neuste BIOS von Lenovo flashen, dabei wird auch die EC-Firmware aktualisiert. Danach das Mod-BIOS seiner Wahl sowie den Flasher herunterladen und die Archive entpacken, die BIOS-Datei von <DATEINAME>.ROM nach BIOS.ROM umbenennen. Anschließend einen bootbaren USB-Stick mit DOS erstellen und die Dateien go.bat, phlash16.exe und BIOS.ROM drauf kopieren.
Vom Stick booten und wenn ihr auf der Kommandozeile seid go.bat eingeben und Enter drücken. Danach kommt eine Fehlermeldung, dass irgendeine Checksumme falsch sei. Diese durch Drücken von z ignorieren, der Flash funktioniert trotzdem.
Alternativ kann man auf der Kommandozeile folgendes eingeben:
Dies speichert das alte BIOS in BACK.ROM und flasht anschließend das Mod-BIOS (BIOS.ROM). Ich habe es zwar nicht ausprobiert, gehe aber davon aus, dass ihr mit
das alte BIOS wieder einspielen könnt, solltet ihr dies aus irgendwelchen Gründen wollen.
Teil 2: FSB-1066-CPUs im T61
Es gibt mehrere Gründe, warum FSB-1066-CPUs im T61 nicht laufen: Die Microcodes für diese CPUs sind nicht im originalen Lenovo-BIOS und der Chipsatz will 800 MHz FSB sehen, sonst startet das Gerät nicht (in anderen Notebooks gibt es auch die Variante, dass die CPU auf den niedrigsten Multiplikator 6x gelockt wird). Außerdem wird der RAM bei FSB-1066 übertaktet. Um dies zu unterbinden, muss das SPD eines DDR2-800-Riegels auf DDR2-667 oder sogar DDR2-533 geflasht und die Timings angepasst werden oder man besorgt sich RAM, der mit dem resultierenden Takt von 440 MHz mit den Timings für DDR2-667 stabil läuft.
1) SPD des RAMs flashen:
Jetzt am Anfang von Post #8 zu finden.
Da ich mittlerweile längst das blöde 20.000-Zeichen-Limit pro Post sprenge, muss ich Teile des ursprünglichen Posts dahin auslagern.
2) Mainboard modifizieren:
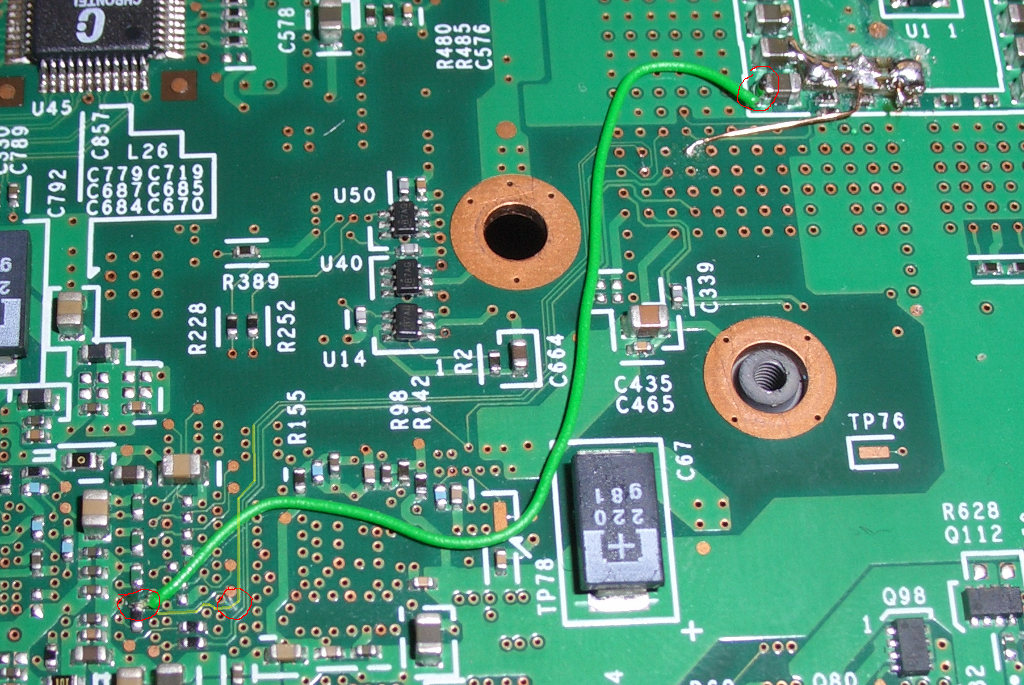
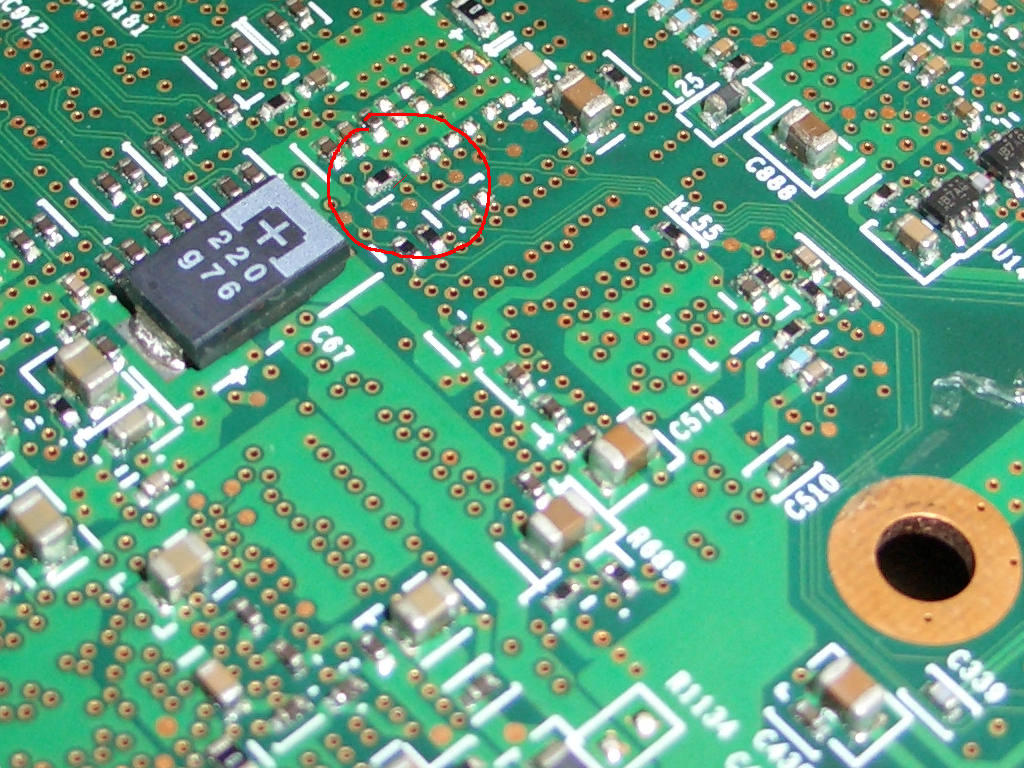
Zuerst schneidet man auf der Unterseite des Mainboards die gelb hinterlegte Leiterbahn durch. Die rot eingekreiste Stelle ist dafür wahrscheinlich noch am besten geeignet, woanders ist es noch enger. Hierbei muss man aufpassen, keine andere Leiterbahn in der Nähe in Mitleidenschaft zu ziehen. Ich habe ein sehr spitzes Skalpell benutzt.
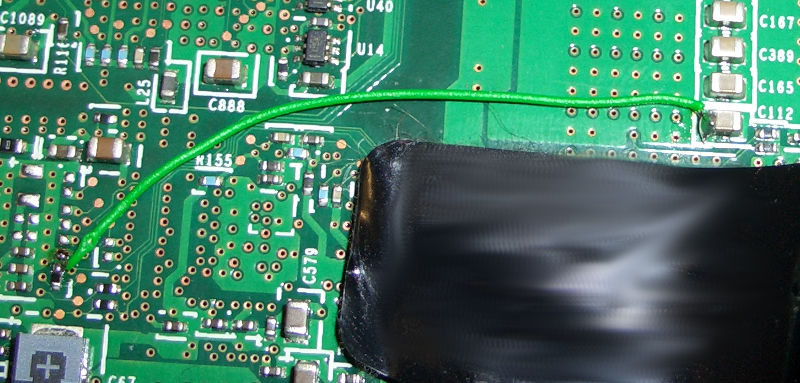
Danach verbindet man die beiden rot eingekreisten Punkte mit einem Kabel.
Dadurch glaubt der Chipsatz, er würde mit FSB-800 bzw. 200 MHz betrieben, auch wenn der FSB tatsächlich 266 MHz beträgt. Macht man die Modifikation auf diese Weise, dann funktionieren sowohl FSB-667- und FSB-800-CPUs als auch FSB-1066-CPUs in dem Board automatisch mit ihrem nativen FSB.
Für 14,1-4:3-Boards und 15,4"-16:10-Boards:
Für 14,1-16:10-Boards ist die Stelle zum Durchritzen woanders:
Kabelverbindung für 14,1-16:10-Boards:
Teil 3: Core 2 Quad zum Laufen bringen:
1) CPU-Pins isolieren:
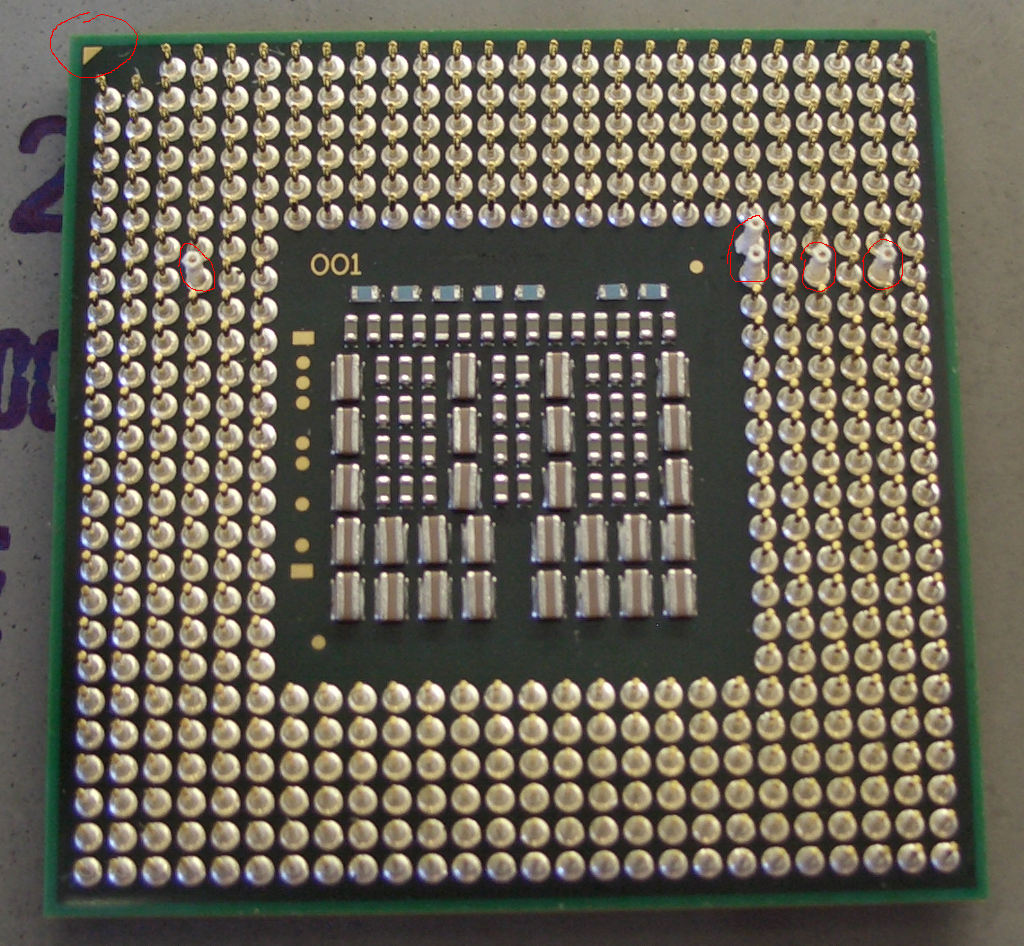
Damit ein Quadcore läuft, müssen die Pins D8, AA7, AA8, AC8 und AE8 isoliert werden. Ich habe hierfür die Isolierung von einem dünnen Kabel aus dem Modellbahn-Zubehör verwendet. Diese "Röhrchen" lassen sich dann mit einer Pinzette leicht auf die entsprechen Pins der CPU stecken.
Man kann stattdessen auch die entsprechenden Pins mit einem Seitenschneider abknipsen. Schmälert allerdings den Wiederverkaufswert des Core2 Quad .
.
2) Löcher im Sockel vergrößern:
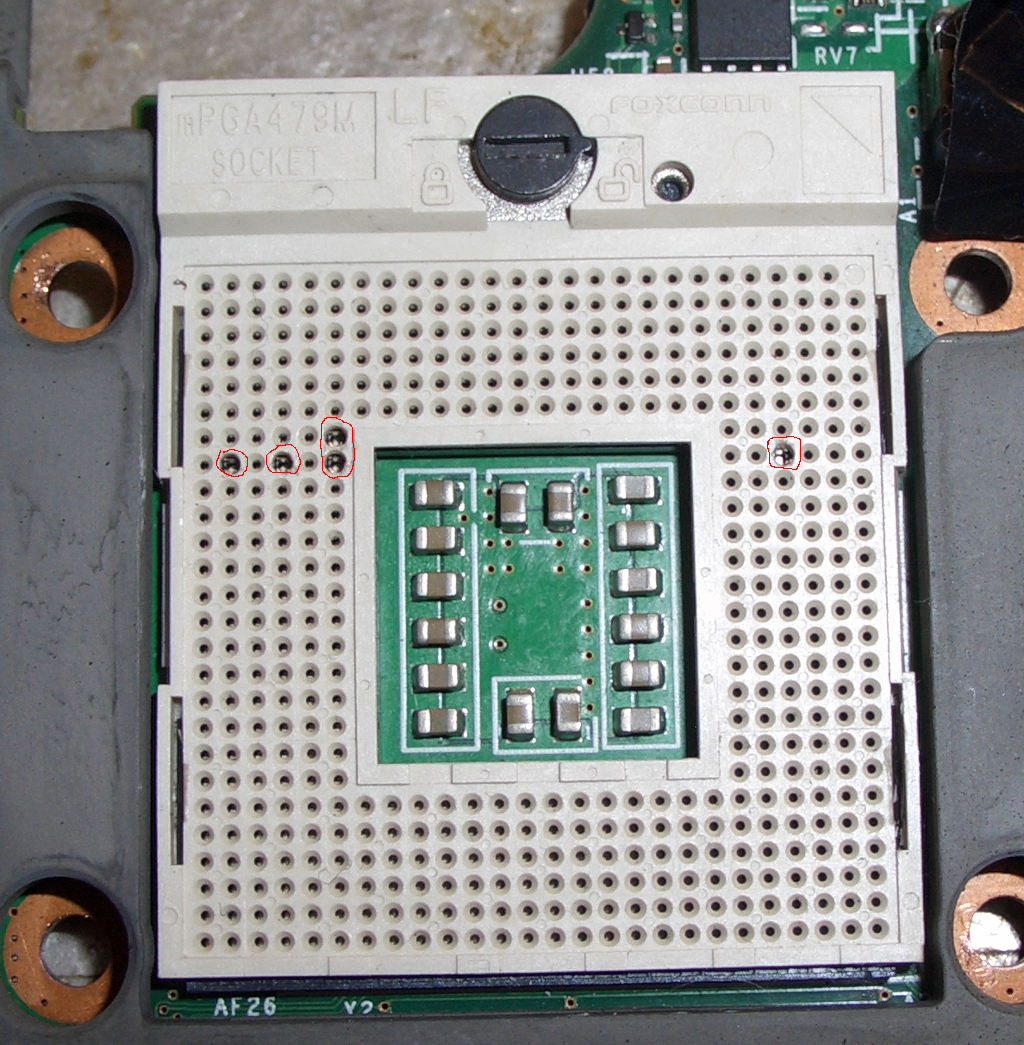
Da die isolierten Pins jetzt dicker sind, müssen die entsprechenden Löcher im Sockel vergrößert werden, damit man die CPU noch reinstecken kann. Damit dabei keine Spähne in den Sockel kommen und die Kontakte nicht beschädigt werden habe ich zunächst das Oberteil mit den Löchern an den vier Schnapphaken seitlich ausgehängt und eine dünne Holzplatte zwischen den Sockel und das Oberteil mit den Löchern geschoben. Danach wurden die entsprechenden Löcher mit einem 1-mm-Bohrer per Hand aufgebohrt.
Auf keinen Fall versuchen, die Löcher aufzubohren, ohne das Oberteil auszuhängen, ansonsten schrottet man die Kontakte im Sockel! Dann noch lieber alle vier Haltenasen abschneiden.
Es gibt zwei verschiedene Sockel, einen schwarzen und einen weißen. Bilder, die zeigen, wie man das Oberteil am besten aushängt, befinden sich in Post #153.

T61-Mainboard Sockel nach der Änderung:
3) Mainboard modifizieren:
Zusätzlich zu den Modifikationen für FSB 1066 ist für den Betrieb eines Quad-Cores noch eine weitere Änderung am Mainboard nötig.
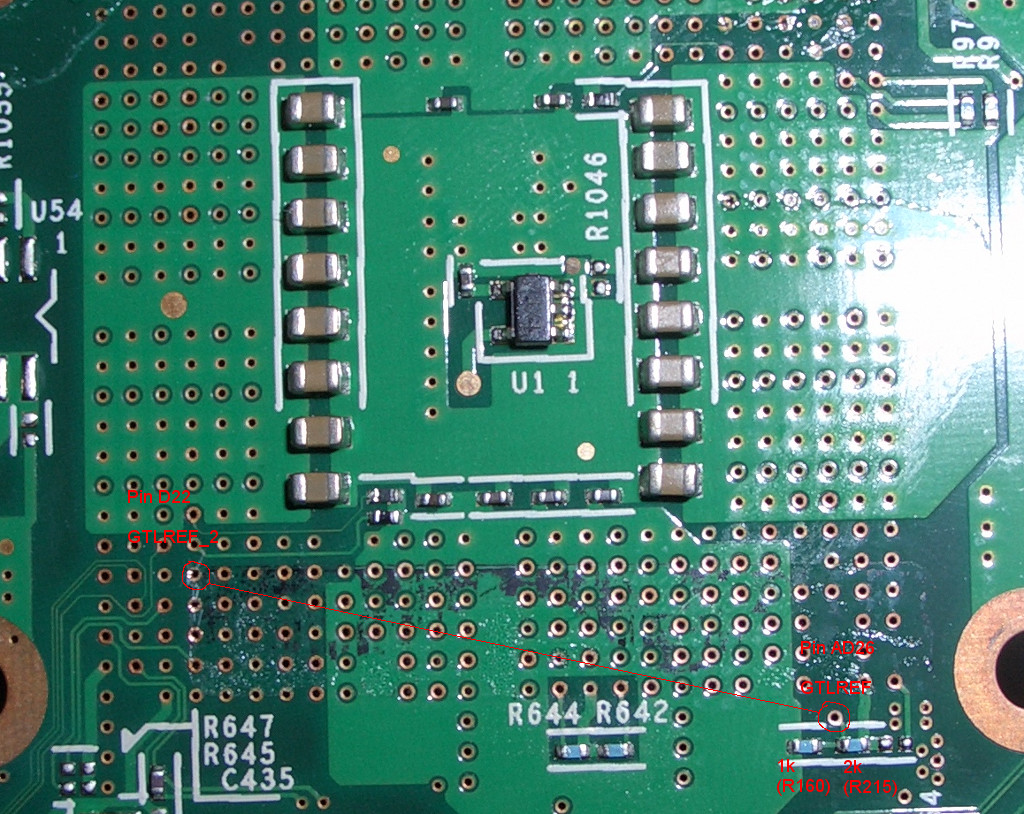
Es gibt ein Signal bzw. Pin GTLREF, an dem 0,63* VCC1R05B anliegen muss. Lenovo macht das über einen Spannungsteiler mit zwei Widerständen (2k und 1k). Bei Quad-Cores ist ein weiterer solcher Pin (D22) vorhanden, der bei den Dual-Cores Reserved ist. An den muss man auch die 0,63*VCC1R05B anlegen.
Für den entsprechenden Sockel-Kontakt ist eine Durchkontaktierung auf dem Mainboard, die man von der Unterseite anzapfen kann. T61-Mainboards der 14"-Widescreen-Modelle haben diese Durchkontaktierung nicht, nur bei den 14"-4:3-Boards und den 15,4"-Widescreen-Boards ist sie vorhanden.
Um den Pin D22 (GTLREF_2) auf 0,63*VCC1R05B zu setzen lötet man eine Kabelverbindung wie im Bild gezeigt von der Durchkontaktierung von GTLREF (Pin AD26) zur Durchkontaktierung von GTLREF_2 (Pin D22). Das Kabel sollte dabei möglichst kurz sein. Diese einfachere Variante stammt vom User FryPpy auf forum.thinkpads.com.
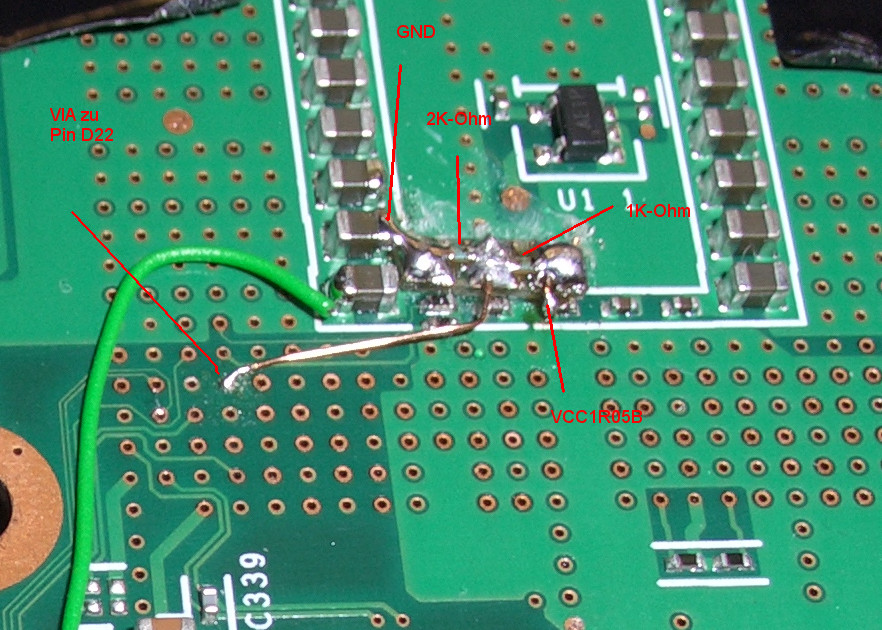
Die ursprünglich verwendete Variante war der Nachbau der Lenovo-Lösung vom W700-Mainboard mit zwei Extra-SMD-Widerständen für GTLREF_2, die aber wegen des erhöhten Aufwands gegenüber der Lösung mit der simplen Kabelverbindung nicht mehr zu empfehlen ist:
Jetzt kann man die Quad-Core-CPU im Sockel platzieren und damit booten.
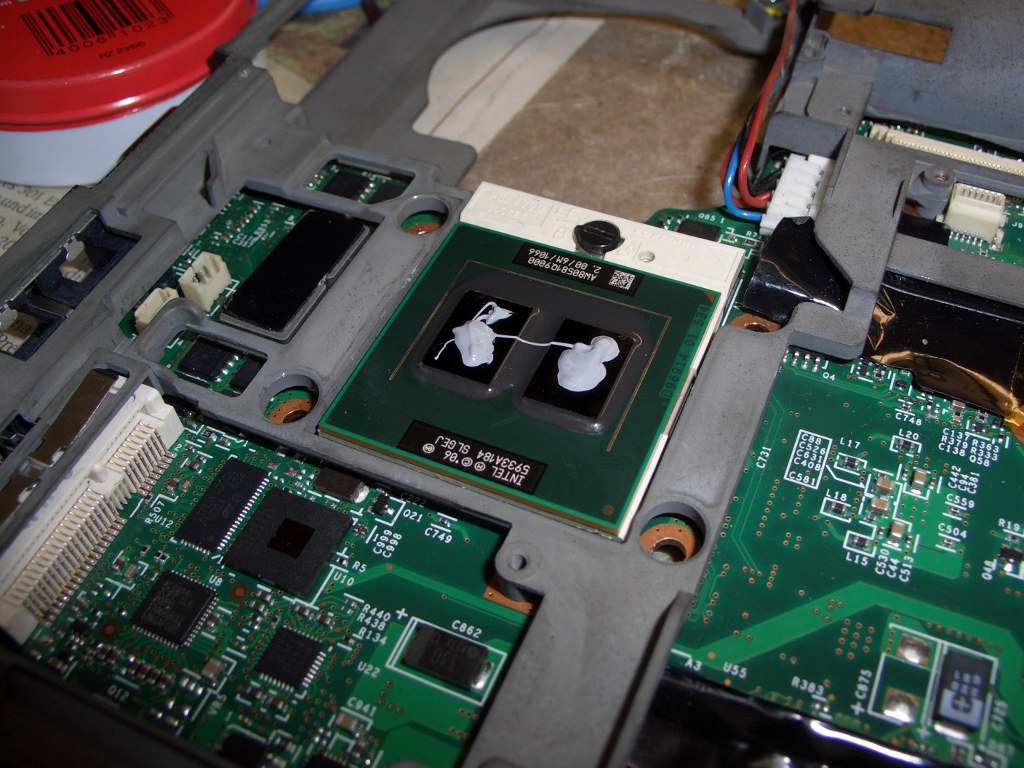
Im BIOS sollte nun der C2Q richtig angezeigt werden. Hat man in Schritt 1 ein BIOS mit Quadcore-Support gewählt, so sollten im Betriebsystem auch alle vier Cores aktiviert sein.
Allerdings hat man noch das Problem, dass nur die ersten beiden Cores auch mit vollem Takt betrieben werden, die letzten beiden Cores laufen immer mit dem niedrigstem Takt. Siehe auch Post 130.
Um dieses Problem zu beheben, siehe Post 142, wo eine funktionierende Lösung für Windows und Linux beschrieben wird.
Stand der Dinge:
Ursprünglich gab es noch Stabilitätsprobleme, die jedoch auf falsche Timings bzw. Einstellungen beim Flashen des SPDs zurückgingen. Nach dem Umflashen des RAMs auf DDR2-667 mit den Timings vom DDR2-800-Profil sind diese verschwunden.
Die Kühlung des Q9000 ist nach dem Einbau eines Kühlers vom T500 mit ATI-Grafik kein Problem mehr und der Core2 Quad läuft absolut stabil. Ein Kühler vom T61 mit Nvidia-Grafik kühlt genauso gut, ist eventuell aber etwas lauter. Nicht zu empfehlen sind die Kühler vom T61 und T500 mit Intel-Grafik, da diese ca. 10°C schlechter kühlen als die zuvor genannten, sowie sämtliche T60-Kühler.
Wieso es beim T500 und W500 nicht geht:
Nun könnte man ja sagen: Das T500 und das R500 haben drei Phasen und nativen Support für FSB 1066, wieso nicht darauf testen? Nun, das habe ich ja zuerst getan, die Ergebnisse sind in diesem Thread in Post 18 und 23 zu finden. Hier musste ich aber, damit ich in ein Betriebssystem booten konnte, im BIOS "Core Multiprocessing" auf "disabled" stellen, so dass sogar nur ein Core aktiv war. Ein Test mit einem X61t, wo ich das auch deaktiviert hatte und dann über ne APIC-Tabelle den zweiten Core wieder aktivieren wollte schlug aber fehl. Demnach scheint es so zu sein, dass diese Option auf "enabled" stehen muss, damit man mittels eigener APIC-Tabelle zusätzliche Cores aktivieren kann. Das T61 bootet mit Quadcore und dieser Option auf "enabled" Betriebssysteme, das T500 nicht.
Nächster Punkt ist das Laden einer eigenen APIC-Tabelle mit GRUB2: Mit dem BIOS des T500 funktioniert dies nicht, bzw. nur mit der Option "-e", was dazu führt, dass nur GRUB2 die eigene APIC-Tabelle benutzt, nicht aber das Betriebssystem, was somit reichlich sinnlos ist.
Beim T500 und W500 bräuchte es also einen entsprechenden BIOS-Mod mit vollem Quad-Core-Support oder es müsste so umgeändert werden, dass man wie beim T61 mit "Core Multiprocessing" auf "enabled" booten und mit GRUB2 ne eigene APIC-Tabelle laden kann. Unwahrscheinlich, dass das jemand hinbekommt. Beim R500 fehlt die Durchkontaktierung am Sockel für den Mod des Mainboards und ob das BIOS sich wie das des T61 verhalten würde, habe ich nicht getestet. T400 und R400 kann ich mangels Hardware nicht testen.
meine Tests von hier mit dem Core 2 Quad Q9000 haben nun doch noch Früchte getragen
Die benötigten Schritte, um eine FSB-1066-CPU in einem T61 zu betreiben, sind ja schon seit langem hier im Forum und an anderer Stelle im Internet zu finden. Nun ist es mir gelungen, basierend darauf auch einen Q9000 in einem T61-Board zum Laufen zu bekommen und zwar mit allen vier Cores aktiv.
Hier nun der Versuch, das ganze in einer Anleitung zusammenzufassen.
Teil 1: Wahl eines Mod-BIOS / GPU undervolten
Auf 51nb.com gibt es modifizierte BIOS-Dateien, die die Microcodes für die FSB-1066-CPUs drin haben. Im originalen Lenovo-BIOS sind diese nicht enthalten, weswegen die CPUs mit FSB 1066 (z. B. die Pxxxx-Serie) im T61 ab Werk nicht laufen.
Ursprünglich war nur eine BIOS-Version von xiaofei290 verfügbar, die die Microcodes vom W700 anstatt vom T61 drin hatte. Mit dieser Version funktionierten zwar FSB-1066-CPUs (inklusive Core2 Quad), die vorher nicht unterstützt wurden, dafür haben aber viele CPUs, die vorher im T61 liefen (z. B. T7500), anschließend nicht mehr funktioniert, da die Microcodes für diese im Mod-BIOS fehlten. Zudem war es beim Einbau eines Core2 Quad mit diesem BIOS nötig, eine modifizierte APIC-Tabelle mit dem acpi-Kommando des Bootloaders Grub2 zu laden, damit alle vier CPU-Kerne aktiviert wurden (statt nur zwei). Diese ursprüngliche Methode ist als Referenz noch in einen Post weiter unten ausgelagert, heute jedoch nicht mehr zu empfehlen. Ich verlinke das alte Mod-BIOS hier noch, jedoch gibt es nun eine deutlich bessere Alternative.
Originalpost von xiaofei290 auf 51nb.com Download-Link
Mittlerweile ist eine ganze Fülle von Mod-BIOS-Versionen von highsun auf 51nb.com verfügbar, unter anderem auch welche extra für Core2 Quads, die die modifizierte APIC-Tabelle bereits enthalten, so dass außer dem BIOS-Flash softwareseitig keine weiteren Änderungen mehr erforderlich sind. Bei all diesen Mod-BIOS-Versionen sind so gut wie alle Microcodes der Core2-Prozessoren enthalten, so dass anders als beim ursprünglichen Mod-BIOS auch Merom-CPUs wie z. B. T7500 weiterhin damit funktionieren. Zudem schalten sie SATA 2 frei und die Whitelist sowie den Thermal Sensing Error ab.
Außerdem gibt es Versionen, die den Nvidia-Grafikchip undervolten (sofern vorhanden) und so Stromverbrauch und Temperaturen senken, wodurch vermutlich auch das Ausfallrisiko durch den Nvidia-Bug verringert wird. Mit dem Lenovo-BIOS wird der Grafikchip standardmäßig mit 1,20 V unter Last und 1,15V im idle beterieben. Die Mod-BIOS-Versionen betreiben den Grafikchip immer mit der gleichen Spannung.
Weitere Versionen aktivieren PCIe Active State Power Management oder übertakten den Nvidia-Grafikchip auf core
Originalpost von highsun auf 51nb.com Achtung, die Bios-Dateien mit dem GPU-Undervolting im ersten Post dort hatten noch einen Fehler drin, die berichtigten Versionen sind dort in Post 76 und hier in der Tabelle verlinkt.
[TABLE="class: grid, width: 1000, align: left"]
[TR]
[TD]Mod-BIOS Download-Link
[/TD]
[TD]Quadcore-APIC-Tabelle
[/TD]
[TD]Spannung der Nvidia-GPU
[/TD]
[TD]ASPM aktiviert
[/TD]
[TD]NVidia-GPU übertaktet
[/TD]
[/TR]
[TR]
[TD]专门网论坛_T61-BIOS.rar
[/TD]
[TD]nein[/TD]
[TD]Standard (1,15 V - 1,20 V)[/TD]
[TD]nein[/TD]
[TD]nein[/TD]
[/TR]
[TR]
[TD]专门网论坛_T61Q_BIOS.rar
[/TD]
[TD]ja[/TD]
[TD]Standard (1,15 V - 1,20 V)[/TD]
[TD]nein[/TD]
[TD]nein[/TD]
[/TR]
[TR]
[TD]专门网论坛_T61-BIOS(1.05).rar
[/TD]
[TD]nein[/TD]
[TD]1,05 V[/TD]
[TD]nein[/TD]
[TD]nein[/TD]
[/TR]
[TR]
[TD]专门网论坛_T61-BIOS(1.05)_ASPM.rar
[/TD]
[TD]nein[/TD]
[TD]1,05 V[/TD]
[TD]ja[/TD]
[TD]nein[/TD]
[/TR]
[TR]
[TD]专门网论坛_T61Q_BIOS(1.05).rar
[/TD]
[TD]ja[/TD]
[TD]1,05 V[/TD]
[TD]nein[/TD]
[TD]nein[/TD]
[/TR]
[TR]
[TD]专门网论坛_T61Q_BIOS(1.05)_ASPM.rar
[/TD]
[TD]ja[/TD]
[TD]1,05 V[/TD]
[TD]ja[/TD]
[TD]nein[/TD]
[/TR]
[TR]
[TD]专门网论坛_T61-BIOS(1.0).rar
[/TD]
[TD]nein[/TD]
[TD]1,00 V[/TD]
[TD]nein[/TD]
[TD]nein[/TD]
[/TR]
[TR]
[TD]专门网论坛_T61-BIOS(1.0)_ASPM.rar
[/TD]
[TD]nein[/TD]
[TD]1,00 V[/TD]
[TD]ja[/TD]
[TD]nein[/TD]
[/TR]
[TR]
[TD]专门网论坛_T61-BIOS(1.0)_OC.rar
[/TD]
[TD]nein[/TD]
[TD]1,00 V[/TD]
[TD]nein[/TD]
[TD]ja[/TD]
[/TR]
[TR]
[TD]专门网论坛_T61-BIOS(1.0)_ASPM_OC.rar
[/TD]
[TD]nein[/TD]
[TD]1,00 V[/TD]
[TD]ja[/TD]
[TD]ja[/TD]
[/TR]
[TR]
[TD]专门网论坛_T61Q_BIOS(1.0).rar
[/TD]
[TD]ja[/TD]
[TD]1,00 V[/TD]
[TD]nein[/TD]
[TD]nein[/TD]
[/TR]
[TR]
[TD]专门网论坛_T61Q_BIOS(1.0)_ASPM.rar
[/TD]
[TD]ja[/TD]
[TD]1,00 V[/TD]
[TD]ja[/TD]
[TD]nein[/TD]
[/TR]
[TR]
[TD]专门网论坛_T61Q_BIOS(1.0)_OC.rar
[/TD]
[TD]ja[/TD]
[TD]1,00 V[/TD]
[TD]nein[/TD]
[TD]ja[/TD]
[/TR]
[TR]
[TD]专门网论坛_T61Q_BIOS(1.0)_ASPM_OC.rar
[/TD]
[TD]ja[/TD]
[TD]1,00 V[/TD]
[TD]ja[/TD]
[TD]ja[/TD]
[/TR]
[TR]
[TD]专门网论坛_T61-BIOS(0.95).rar
[/TD]
[TD]nein[/TD]
[TD]0,95 V[/TD]
[TD]nein[/TD]
[TD]nein[/TD]
[/TR]
[TR]
[TD]专门网论坛_T61-BIOS(0.95)_ASPM.rar
[/TD]
[TD]nein[/TD]
[TD]0,95 V[/TD]
[TD]ja[/TD]
[TD]nein[/TD]
[/TR]
[TR]
[TD]专门网论坛_T61Q_BIOS(0.95).rar
[/TD]
[TD]ja[/TD]
[TD]0,95 V[/TD]
[TD]nein[/TD]
[TD]nein[/TD]
[/TR]
[TR]
[TD]专门网论坛_T61Q_BIOS(0.95)_ASPM.rar
[/TD]
[TD]ja[/TD]
[TD]0,95 V[/TD]
[TD]ja[/TD]
[TD]nein[/TD]
[/TR]
[TR]
[TD]专门网论坛_T61-BIOS(0.9).rar
[/TD]
[TD]nein[/TD]
[TD]0,90V[/TD]
[TD]nein[/TD]
[TD]nein[/TD]
[/TR]
[TR]
[TD]专门网论坛_T61-BIOS(0.9)_ASPM.rar
[/TD]
[TD]nein[/TD]
[TD]0,90V[/TD]
[TD]ja[/TD]
[TD]nein[/TD]
[/TR]
[TR]
[TD]专门网论坛_T61Q_BIOS(0.9).rar
[/TD]
[TD]ja[/TD]
[TD]0,90V[/TD]
[TD]nein[/TD]
[TD]nein[/TD]
[/TR]
[TR]
[TD]专门网论坛_T61Q_BIOS(0.9)_ASPM_.rar
[/TD]
[TD]ja[/TD]
[TD]0,90V[/TD]
[TD]ja[/TD]
[TD]nein[/TD]
[/TR]
[/TABLE]
Zuerst überprüfen, ob man die neuste EC-Firmware 1.08 auf seinem T61 hat. Falls nicht, zunächst das neuste BIOS von Lenovo flashen, dabei wird auch die EC-Firmware aktualisiert. Danach das Mod-BIOS seiner Wahl sowie den Flasher herunterladen und die Archive entpacken, die BIOS-Datei von <DATEINAME>.ROM nach BIOS.ROM umbenennen. Anschließend einen bootbaren USB-Stick mit DOS erstellen und die Dateien go.bat, phlash16.exe und BIOS.ROM drauf kopieren.
Vom Stick booten und wenn ihr auf der Kommandozeile seid go.bat eingeben und Enter drücken. Danach kommt eine Fehlermeldung, dass irgendeine Checksumme falsch sei. Diese durch Drücken von z ignorieren, der Flash funktioniert trotzdem.
Alternativ kann man auf der Kommandozeile folgendes eingeben:
Code:
phlash16.exe BIOS.ROM /S /X /C /MODE=3 /BO=BACK.ROM
Code:
phlash16.exe BACK.ROM /S /X /C /MODE=3Teil 2: FSB-1066-CPUs im T61
Es gibt mehrere Gründe, warum FSB-1066-CPUs im T61 nicht laufen: Die Microcodes für diese CPUs sind nicht im originalen Lenovo-BIOS und der Chipsatz will 800 MHz FSB sehen, sonst startet das Gerät nicht (in anderen Notebooks gibt es auch die Variante, dass die CPU auf den niedrigsten Multiplikator 6x gelockt wird). Außerdem wird der RAM bei FSB-1066 übertaktet. Um dies zu unterbinden, muss das SPD eines DDR2-800-Riegels auf DDR2-667 oder sogar DDR2-533 geflasht und die Timings angepasst werden oder man besorgt sich RAM, der mit dem resultierenden Takt von 440 MHz mit den Timings für DDR2-667 stabil läuft.
1) SPD des RAMs flashen:
Jetzt am Anfang von Post #8 zu finden.
Da ich mittlerweile längst das blöde 20.000-Zeichen-Limit pro Post sprenge, muss ich Teile des ursprünglichen Posts dahin auslagern.
2) Mainboard modifizieren:
Zuerst schneidet man auf der Unterseite des Mainboards die gelb hinterlegte Leiterbahn durch. Die rot eingekreiste Stelle ist dafür wahrscheinlich noch am besten geeignet, woanders ist es noch enger. Hierbei muss man aufpassen, keine andere Leiterbahn in der Nähe in Mitleidenschaft zu ziehen. Ich habe ein sehr spitzes Skalpell benutzt.
Danach verbindet man die beiden rot eingekreisten Punkte mit einem Kabel.
Dadurch glaubt der Chipsatz, er würde mit FSB-800 bzw. 200 MHz betrieben, auch wenn der FSB tatsächlich 266 MHz beträgt. Macht man die Modifikation auf diese Weise, dann funktionieren sowohl FSB-667- und FSB-800-CPUs als auch FSB-1066-CPUs in dem Board automatisch mit ihrem nativen FSB.
Für 14,1-4:3-Boards und 15,4"-16:10-Boards:

Für 14,1-16:10-Boards ist die Stelle zum Durchritzen woanders:

Kabelverbindung für 14,1-16:10-Boards:

Teil 3: Core 2 Quad zum Laufen bringen:
1) CPU-Pins isolieren:
Damit ein Quadcore läuft, müssen die Pins D8, AA7, AA8, AC8 und AE8 isoliert werden. Ich habe hierfür die Isolierung von einem dünnen Kabel aus dem Modellbahn-Zubehör verwendet. Diese "Röhrchen" lassen sich dann mit einer Pinzette leicht auf die entsprechen Pins der CPU stecken.
Man kann stattdessen auch die entsprechenden Pins mit einem Seitenschneider abknipsen. Schmälert allerdings den Wiederverkaufswert des Core2 Quad

2) Löcher im Sockel vergrößern:
Da die isolierten Pins jetzt dicker sind, müssen die entsprechenden Löcher im Sockel vergrößert werden, damit man die CPU noch reinstecken kann. Damit dabei keine Spähne in den Sockel kommen und die Kontakte nicht beschädigt werden habe ich zunächst das Oberteil mit den Löchern an den vier Schnapphaken seitlich ausgehängt und eine dünne Holzplatte zwischen den Sockel und das Oberteil mit den Löchern geschoben. Danach wurden die entsprechenden Löcher mit einem 1-mm-Bohrer per Hand aufgebohrt.
Auf keinen Fall versuchen, die Löcher aufzubohren, ohne das Oberteil auszuhängen, ansonsten schrottet man die Kontakte im Sockel! Dann noch lieber alle vier Haltenasen abschneiden.
Es gibt zwei verschiedene Sockel, einen schwarzen und einen weißen. Bilder, die zeigen, wie man das Oberteil am besten aushängt, befinden sich in Post #153.

T61-Mainboard Sockel nach der Änderung:

3) Mainboard modifizieren:
Zusätzlich zu den Modifikationen für FSB 1066 ist für den Betrieb eines Quad-Cores noch eine weitere Änderung am Mainboard nötig.
Es gibt ein Signal bzw. Pin GTLREF, an dem 0,63* VCC1R05B anliegen muss. Lenovo macht das über einen Spannungsteiler mit zwei Widerständen (2k und 1k). Bei Quad-Cores ist ein weiterer solcher Pin (D22) vorhanden, der bei den Dual-Cores Reserved ist. An den muss man auch die 0,63*VCC1R05B anlegen.
Für den entsprechenden Sockel-Kontakt ist eine Durchkontaktierung auf dem Mainboard, die man von der Unterseite anzapfen kann. T61-Mainboards der 14"-Widescreen-Modelle haben diese Durchkontaktierung nicht, nur bei den 14"-4:3-Boards und den 15,4"-Widescreen-Boards ist sie vorhanden.
Um den Pin D22 (GTLREF_2) auf 0,63*VCC1R05B zu setzen lötet man eine Kabelverbindung wie im Bild gezeigt von der Durchkontaktierung von GTLREF (Pin AD26) zur Durchkontaktierung von GTLREF_2 (Pin D22). Das Kabel sollte dabei möglichst kurz sein. Diese einfachere Variante stammt vom User FryPpy auf forum.thinkpads.com.

Die ursprünglich verwendete Variante war der Nachbau der Lenovo-Lösung vom W700-Mainboard mit zwei Extra-SMD-Widerständen für GTLREF_2, die aber wegen des erhöhten Aufwands gegenüber der Lösung mit der simplen Kabelverbindung nicht mehr zu empfehlen ist:

Jetzt kann man die Quad-Core-CPU im Sockel platzieren und damit booten.

Im BIOS sollte nun der C2Q richtig angezeigt werden. Hat man in Schritt 1 ein BIOS mit Quadcore-Support gewählt, so sollten im Betriebsystem auch alle vier Cores aktiviert sein.

Allerdings hat man noch das Problem, dass nur die ersten beiden Cores auch mit vollem Takt betrieben werden, die letzten beiden Cores laufen immer mit dem niedrigstem Takt. Siehe auch Post 130.
Um dieses Problem zu beheben, siehe Post 142, wo eine funktionierende Lösung für Windows und Linux beschrieben wird.
Stand der Dinge:
Ursprünglich gab es noch Stabilitätsprobleme, die jedoch auf falsche Timings bzw. Einstellungen beim Flashen des SPDs zurückgingen. Nach dem Umflashen des RAMs auf DDR2-667 mit den Timings vom DDR2-800-Profil sind diese verschwunden.
Die Kühlung des Q9000 ist nach dem Einbau eines Kühlers vom T500 mit ATI-Grafik kein Problem mehr und der Core2 Quad läuft absolut stabil. Ein Kühler vom T61 mit Nvidia-Grafik kühlt genauso gut, ist eventuell aber etwas lauter. Nicht zu empfehlen sind die Kühler vom T61 und T500 mit Intel-Grafik, da diese ca. 10°C schlechter kühlen als die zuvor genannten, sowie sämtliche T60-Kühler.
Wieso es beim T500 und W500 nicht geht:
Nun könnte man ja sagen: Das T500 und das R500 haben drei Phasen und nativen Support für FSB 1066, wieso nicht darauf testen? Nun, das habe ich ja zuerst getan, die Ergebnisse sind in diesem Thread in Post 18 und 23 zu finden. Hier musste ich aber, damit ich in ein Betriebssystem booten konnte, im BIOS "Core Multiprocessing" auf "disabled" stellen, so dass sogar nur ein Core aktiv war. Ein Test mit einem X61t, wo ich das auch deaktiviert hatte und dann über ne APIC-Tabelle den zweiten Core wieder aktivieren wollte schlug aber fehl. Demnach scheint es so zu sein, dass diese Option auf "enabled" stehen muss, damit man mittels eigener APIC-Tabelle zusätzliche Cores aktivieren kann. Das T61 bootet mit Quadcore und dieser Option auf "enabled" Betriebssysteme, das T500 nicht.
Nächster Punkt ist das Laden einer eigenen APIC-Tabelle mit GRUB2: Mit dem BIOS des T500 funktioniert dies nicht, bzw. nur mit der Option "-e", was dazu führt, dass nur GRUB2 die eigene APIC-Tabelle benutzt, nicht aber das Betriebssystem, was somit reichlich sinnlos ist.
Beim T500 und W500 bräuchte es also einen entsprechenden BIOS-Mod mit vollem Quad-Core-Support oder es müsste so umgeändert werden, dass man wie beim T61 mit "Core Multiprocessing" auf "enabled" booten und mit GRUB2 ne eigene APIC-Tabelle laden kann. Unwahrscheinlich, dass das jemand hinbekommt. Beim R500 fehlt die Durchkontaktierung am Sockel für den Mod des Mainboards und ob das BIOS sich wie das des T61 verhalten würde, habe ich nicht getestet. T400 und R400 kann ich mangels Hardware nicht testen.
Zuletzt bearbeitet:


